

Today, with Best Practice Medicine Co-Founder (and COO), Loren Deichman, and your BPM-TV host Miles Hackney, we'll be giving an in-depth description of how to place and obtain a diagnostic quality electrocardiogram. Quick trivia: Did you know electrocardiogram is abbreviated as both EKG and ECG? In German it's "Elektro-kardiographie"; in English it's "electrocardiography". An EKG is a record of electrical current in the heart over time. For many EMTs and Paramedics a 12-lead EKG is a vital tool in patient care. OK, let's dive in! Watch the video below or read on for the point by point training.
Hello, everybody. This is Loren and Miles with Best Practice Medicine. Today we're going to be demonstrating how to apply and acquire a diagnostic quality 12 lead ECG.
The first step in acquiring a diagnostic quality 12 lead ECG is the proper positioning of your patient. Ideally, your patient should be in a supine position. However, some patients will not tolerate this. If that's the case, you can put them in a Semi-Fowler's position, partially reclined. Whichever position your patient is in for the EKG, just remember to repeat that position for any future, repeat EKGs you may acquire.
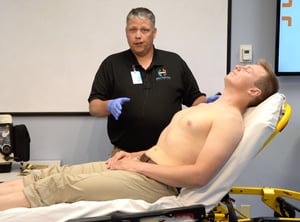
The second step to acquire a diagnostic quality 12 lead ECG is to expose the area where the electrodes are going to be placed. In this case, we're going to have to remove Miles's shirt and expose his lower limbs so we can place the limb leads. At this point, we're ready to place our limb leads.
Now, a few things about limb lead placement in the 12 lead. There's only a few rules to have to adhere to to obtain a diagnostic quality ECG when placing limb leads. Number one is you want to make sure that your limb lead is on the limb, that it falls between the shoulder and the wrist. The other rule about limb leads is that you do not want to put them over bony prominences, such as the elbow here, or over large muscle groups. That's just going to increase the amount of artifact. Additionally, limb leads should be symmetrical, so about the same area on the left extremity as on the right. The same rules apply for the legs. Below the hip but above the ankle, staying away from bony prominences and large muscle groups. In this case, just due to access to Miles's legs, we can go ahead and put them just above the ankles.
Now that we've identified our limb lead electrode placement sites, we do need to select a package of electrodes. In this case, our electrodes are in date. This is a 10 pack, so we'll be using all of these for all of our lead placements. Being in date we presumably have conductive gel that is not dried out on these, which is important. The other thing about these electrodes, these differ in style from EKG machine to EKG machine. These are more for the pre-hospital type of EKG monitors. In hospital, you might find a tab style. It doesn't really matter the style of EKG electrodes, placement and acquisition of the 12 lead and the principles of that remain the same despite the manufacturer.
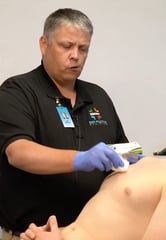 Now that we've selected our electrodes, we're going to turn our attention to proper skin preparation. The first thing to consider is the amount of body hair. In this case, with large amounts of body hair that's going to affect the adhesion of electrode and transmission of the signal through the electrode, you're going to want to take a razor, oftentimes it's a disposable safety razor, and remove the hair from the skin. The other thing to consider is the oils left on the skin as well. If you take an alcohol pad and rub the area where the electrode is going to adhere, that will remove the oils from the skin. In some cases, you might have an excessive amount of dead or dry skin. That will also affect the signal acquisition for your 12 lead. In this case, you're going to grab a 4x4 or gauze and you'll rub the area, 10 to 12 strokes, until it gets just a little bit pink, and that maneuver will remove the dead skin and improve the quality of your 12 lead ECG.
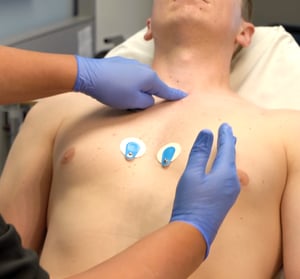 At this point, with our skin prepped, we're ready to apply the limb leads. I'll take my electrodes, I will open them up. I will find the appropriate electrode. These are labeled. Right leg, left leg, right arm, and left arm. Let's go here. Now that we have the limb leads placed, we're going to turn our attention and place the chest leads, or the precordial leads. Unlike the limb lead placement, the chest leads must be exact, so there's quite a few rules to the chest lead placement in order to acquire a diagnostic quality 12 lead ECG. The first landmark that we need to find in order to place our chest leads is the fourth intercostal space. We can do this two ways. The first way to do this is to locate the angle of Louis. First, you're going to find the sternal notch and you're going to feel, or palpate, about an inch and a half below the sternal notch. You'll feel this ridge in the sternum. This is the angle of Louis. It's the junction of the sternal body and the manubrium. This slight ridge that you feel in the sternum is at the level of the second rib, so immediately to the left or right of this you will feel the actual rib. That is the second rib.

Below the second rib, you will find the second intercostal space. From here, we're going to march down, feeling each rib and each space, all the way down until we find the fourth intercostal space. So, if this is the second ICS, there's the third rib. Here's the third ICS. Here's the fourth rib, and here is the fourth intercostal space. This is where we're going to place V1, just immediately to the right of the sternum. V2 is going to be placed at the same level, immediately to the left of the sternum. The second method for locating the fourth intercostal space is to palpate the clavicle. Immediately inferior to the clavicle, that rib space that you feel is the first intercostal space. So, below that, feeling for the rib in a similar technique that we did just before, that would be the second rib. Again, below that is the second intercostal space. Third rib, third intercostal space, fourth rib, and then finally the fourth intercostal space. Again, V1 goes to the right of the sternum and V2 goes immediately to the left of the sternum.
Now that we have placed V1 and V2, we're going to skip V3 and find the landmark for V4. V4 lies at the fifth intercostal space, mid-clavicular line. So, now that we've found our fourth intercostal space, it's not too difficult to find the fifth. You just palpate the fifth rib, and then the space below that. What we're going to have to do now is to find the clavicle. Be sure to establish the full length of the clavicle then, basically split the middle difference. Once we find the full length of clavicle, we split that difference and intersect with the fifth ICS. Lead V4 is going to be placed at this level. Fifth intercostal space, mid-clavicular line. Now that we've placed lead V4, we're going to skip lead V5 and place lead V6. V6 lies at the level of lead V4, but it's at the midaxillary line. Miles, would you go ahead and lift your arm up? At this point, we're going to have to estimate where the midaxillary line is, and by the name midaxillary, it's mid-axilla. So, if you locate their axilla and just draw a line directly down, this is your midaxillary line. What we're going to do is just march it perpendicular to the midaxillary line, and that's where lead 6, V6, is going to be placed. It's important to note when placing V6 that it does not follow the fifth intercostal space. You want to be perpendicular to the midaxillary line.
Now that we have placed V1, V2, V4, and V6, we need to place V3 and V5 because we skipped those. This is just a matter of splitting the distance equally between the electrodes that we have placed. So, lead V3 goes halfway between V2 and V4. V5 will be placed halfway between V4 and V6. Now that we've placed all of our electrodes on the chest, we can locate our chest electrode, or precordial electrode, wires and then place them on the appropriate electrode. In this model, they are labeled V1 through V6. You may encounter a situation where these are very short, depending on the model, and it may pull your electrode out of place. If that's the case, you're going to have to probably replace the electrode, as the original electrode won't stick once that happens. Now, with this model I will have to hook up the precordial wire bundle with my four lead wire set. Now I'm ready to acquire the 12 lead ECG.
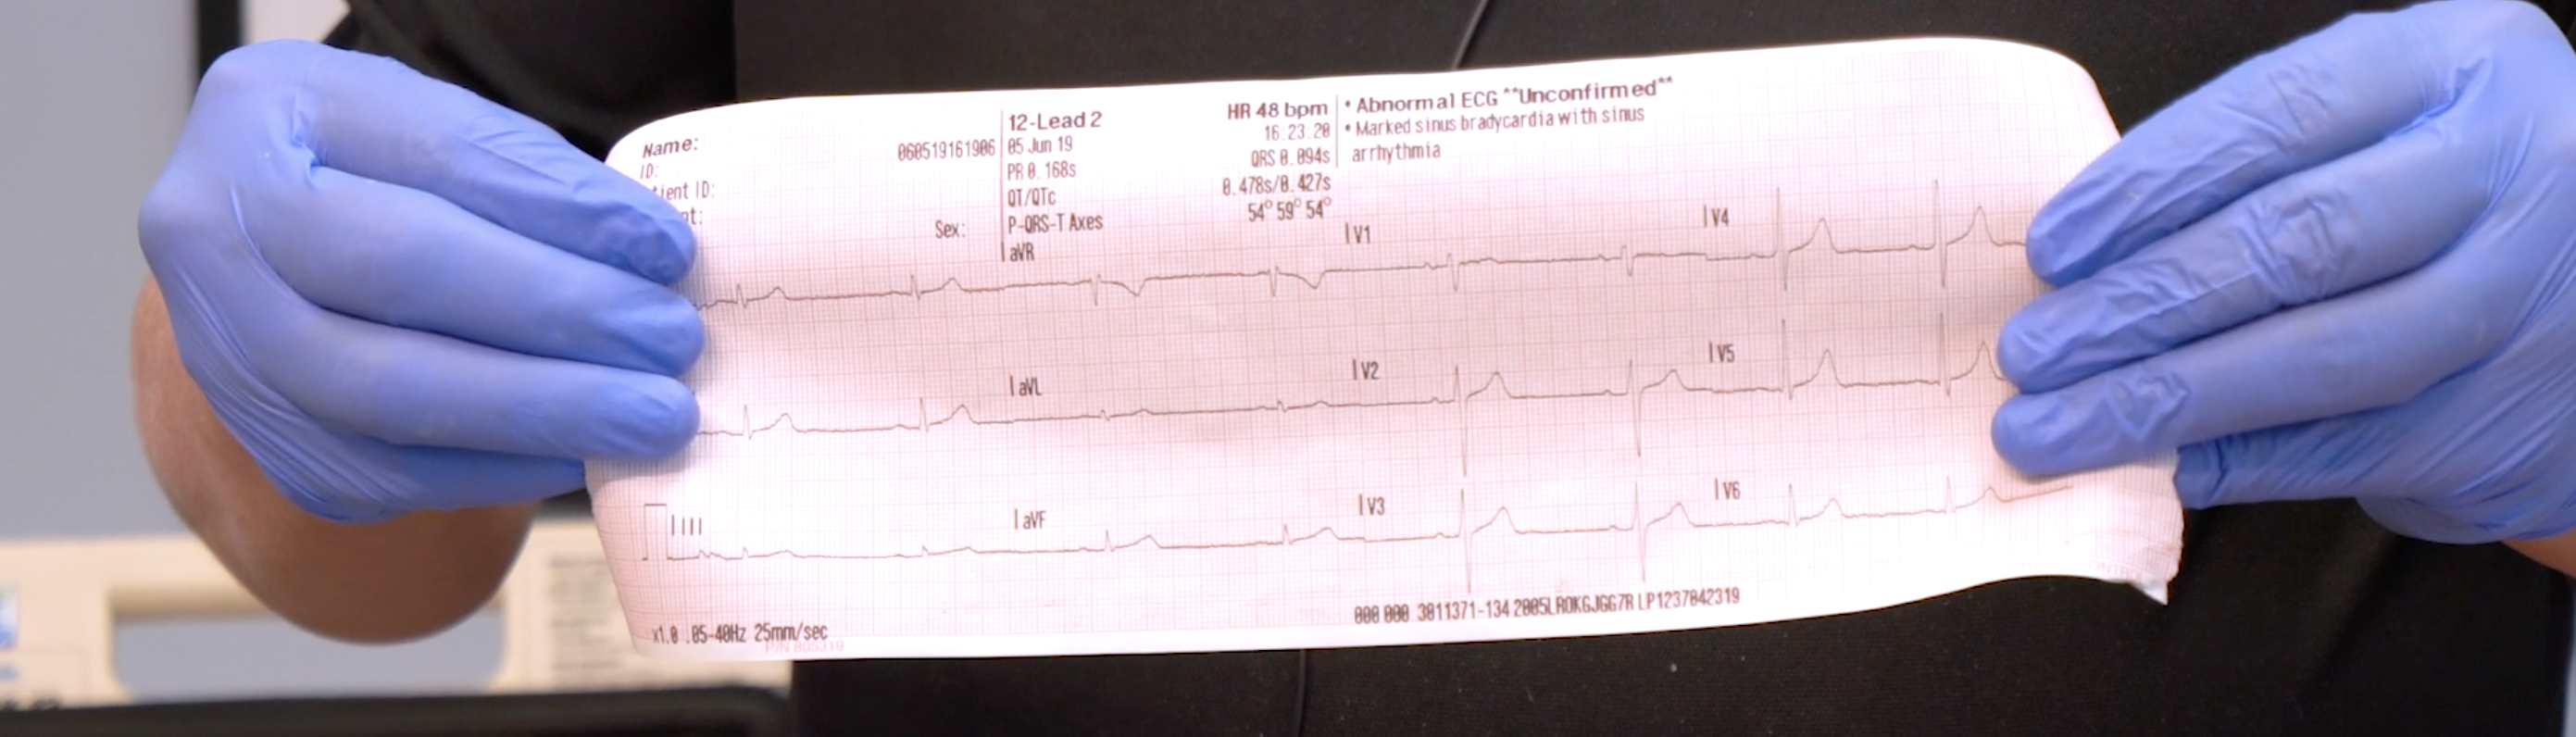
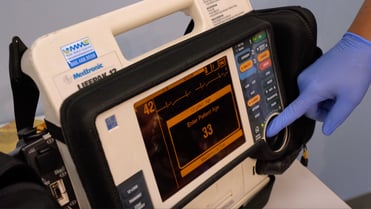 Now that we're ready to acquire the 12 lead ECG, I'm going to lay Miles in a more supine position here, as we had discussed. In addition, we want his upper and lower extremities uncrossed. We want them relaxed, as to not cause any muscle tremors. So, if you can put your arms down at your side, we'll go ahead and relax the shoulders. We'll make sure the legs are not crossed. If their hands are resting on a metal bed rail, we want to make sure that's not happening. Also, there can be interference from portable electronic devices, so if you have phones or anything like that, you might want to set them a little farther away from the patient. That way, it won't affect the quality of your 12 lead. On this model, I simply press the 12 lead button and it's going to acquire the 12 lead. During this time, you want your patient just to remain still. Don't hold their breath, they just need to breath normal. After a few moments, after acquiring and analyzing the 12 lead, it should print out. And, there you have a diagnostic quality 12 lead ECG.
We hope you've found this post informative and useful to your clinical practice. Tune in next time for more from BPM-TV, and as always, thanks for watching.
Want to know what the 12 lead ECG printout means? Discover the intricacies and minute considerations for acquiring quality diagnostic readings with pre-hospital electrocardiograms. Go beyond electrode placement with one of our EKG(ECG) interpretation courses: https://bestpracticemedicine.com/courses/specialty-courses